Rafiki Admin application user guide
The Rafiki Admin application provides tools to manage tenants, assets, peers wallet addresses, webhook events, payments, and account settings. It functions as an interface to the Rafiki backend service and all actions performed, such as fetching data or executing commands, are passed to the Rafiki backend service. The purpose of this document is to help you navigate and use the Rafiki Admin application effectively.
- Familiarity with general Rafiki concepts. The Rafiki overview is a great place to start.
- Running the Rafiki
frontendpackage. See Frontend service for more information.
Rafiki Admin relies on the Ory Kratos identity and user management solution to handle authentication (login) and user management (account creation and password recovery).
Access to Rafiki Admin uses an invitation-only system to ensure that only authorized users can register for an account. New users must be invited by an administrator. The registration flow is not public, so users cannot sign up on their own. Instead, administrators create accounts using the invite-user script.
An administrator (someone with backend interface system access) can run the invite-user script in one of two ways: from outside the container on the host machine where Docker is running or directly inside the Rafiki Admin Docker container.
docker exec -it <admin-container-name> npm run invite-user -- example@mail.comnpm run invite-user -- example@mail.comAfter running the invite-user script, the script generates a recovery link that also serves as an invitation link. This link is output to the terminal, and the administrator can send it to the user. When the user opens the link in their browser, they are automatically logged in and taken to the account settings page where they can set a new password. Afterward, they can log in normally via the Rafiki Admin URL.
Rafiki Admin provides an automated account recovery flow which requires an SMTP mail server for sending recovery links to users. Alternatively, an administrator can generate a recovery link using the same invite-user script.
To remove a user, administrators can run the following script in a terminal window:
docker exec -it <admin-container-name> npm run delete-user -- example@mail.com.We chose Kratos for its open-source nature, lightweight design, and robust security features. It eliminates the need to manage password hashing, storage, or account recovery flows ourselves, allowing us to focus on what we do best.
Kratos also enhances security with features like built-in breach detection, secure session management, and regular security updates.
Ory Kratos provides frontend components (such as forms and buttons) for identity management flows like login, and account settings. These components are not fixed in design; they are fetched via API calls which allows us to match the identity management components with Rafiki Admin’s overall look and feel.
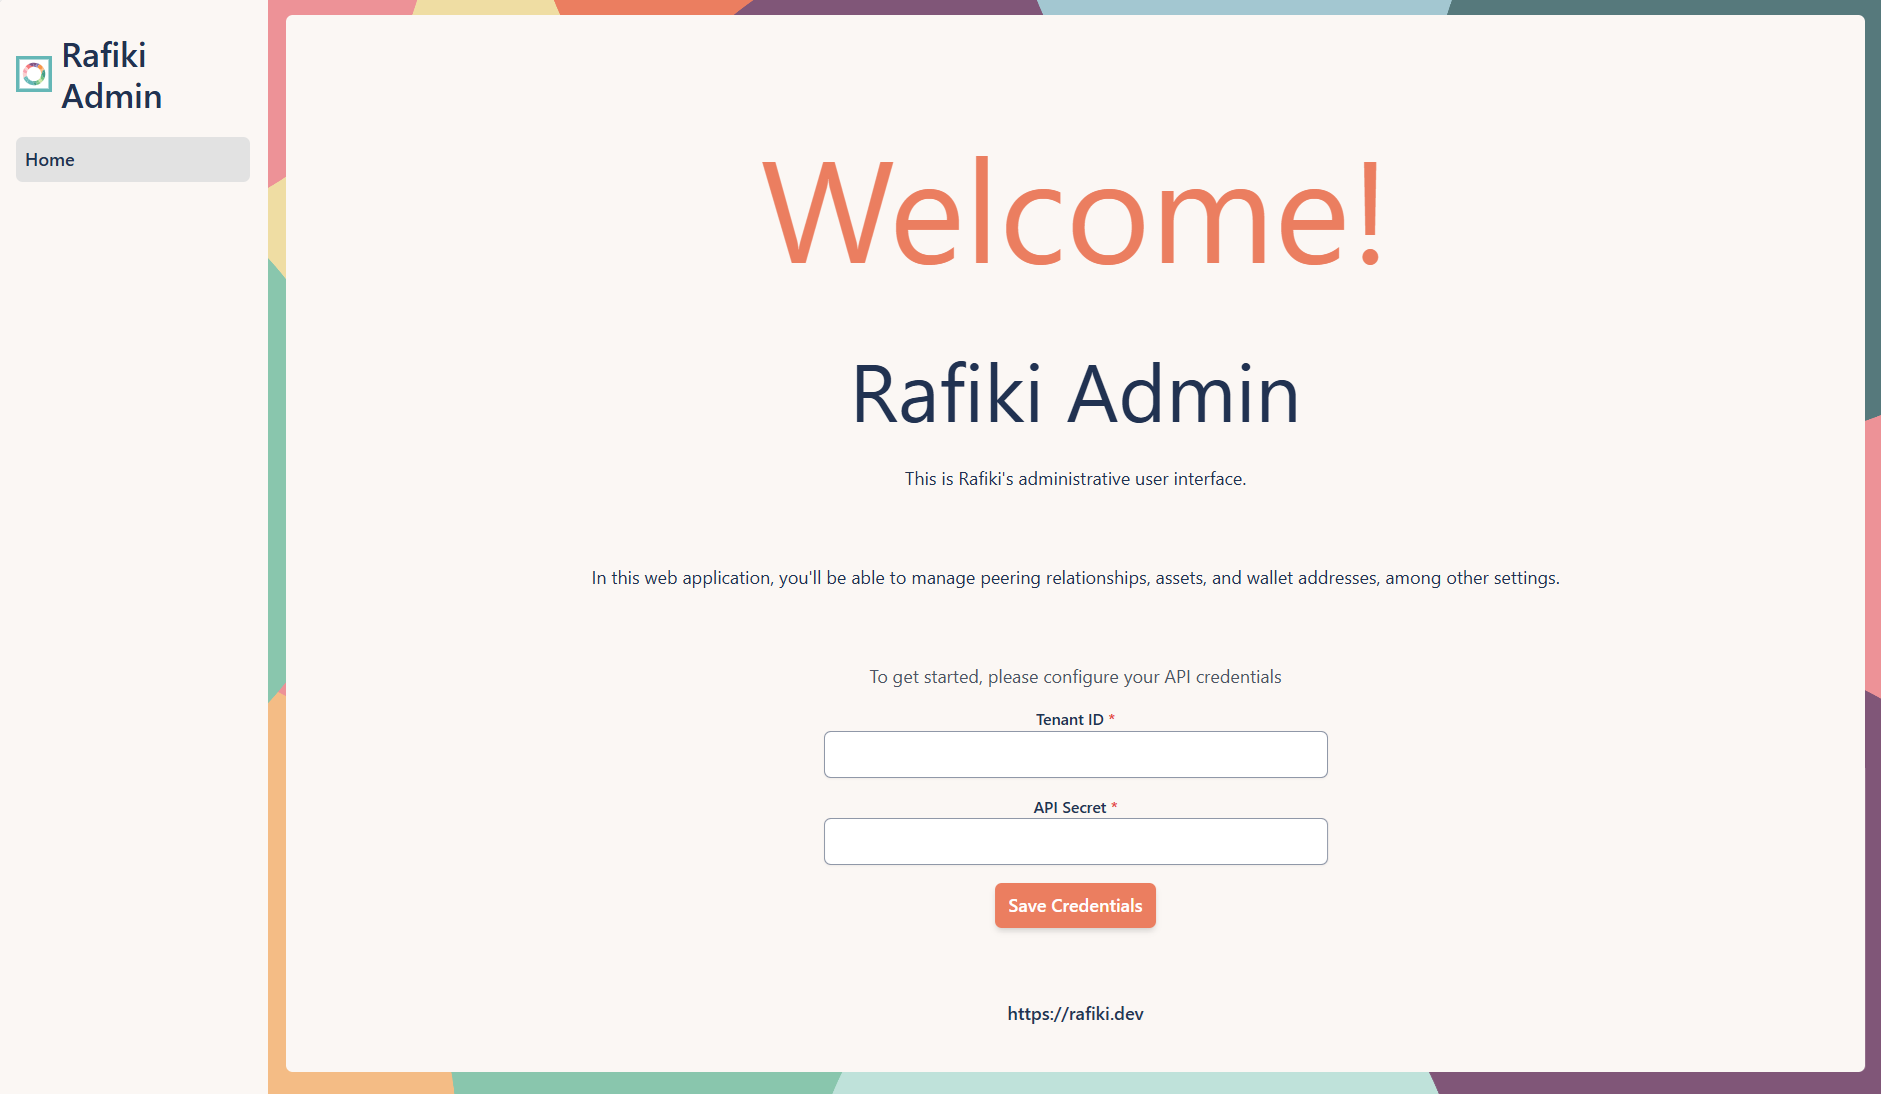
To access your data and manage resources within your tenant, you must configure your API credentials. Enter your tenant ID and API secret and select Save Credentials
After successfully configuring your API credentials, a message will appear indicating that the credentials have been configured, and the left navigation menu will be populated with the available options.
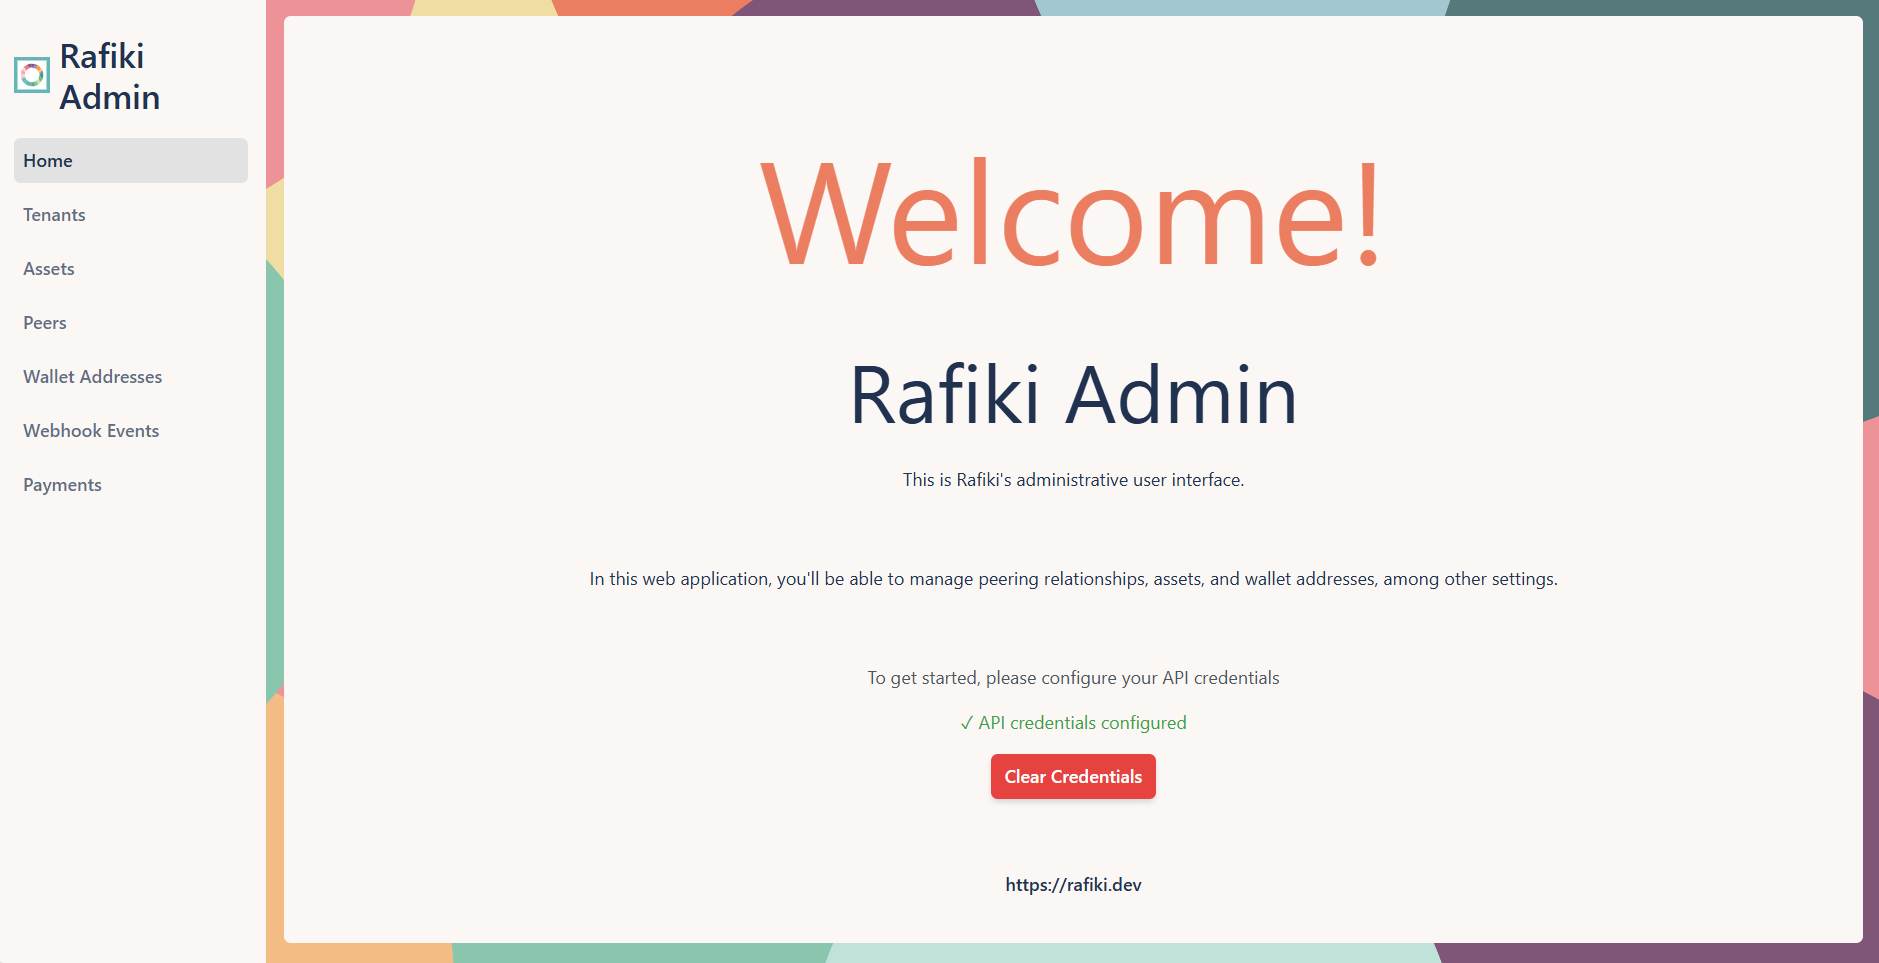
The Clear Credentials button allows you to clear your stored API credentials. You might want to clear your credentials in order to switch tenants or troubleshoot connection issues.
After logging in, you’ll be greeted by the main landing page with a left-hand navigation menu. This menu provides access to the main functionality needed to manage your Rafiki instance.
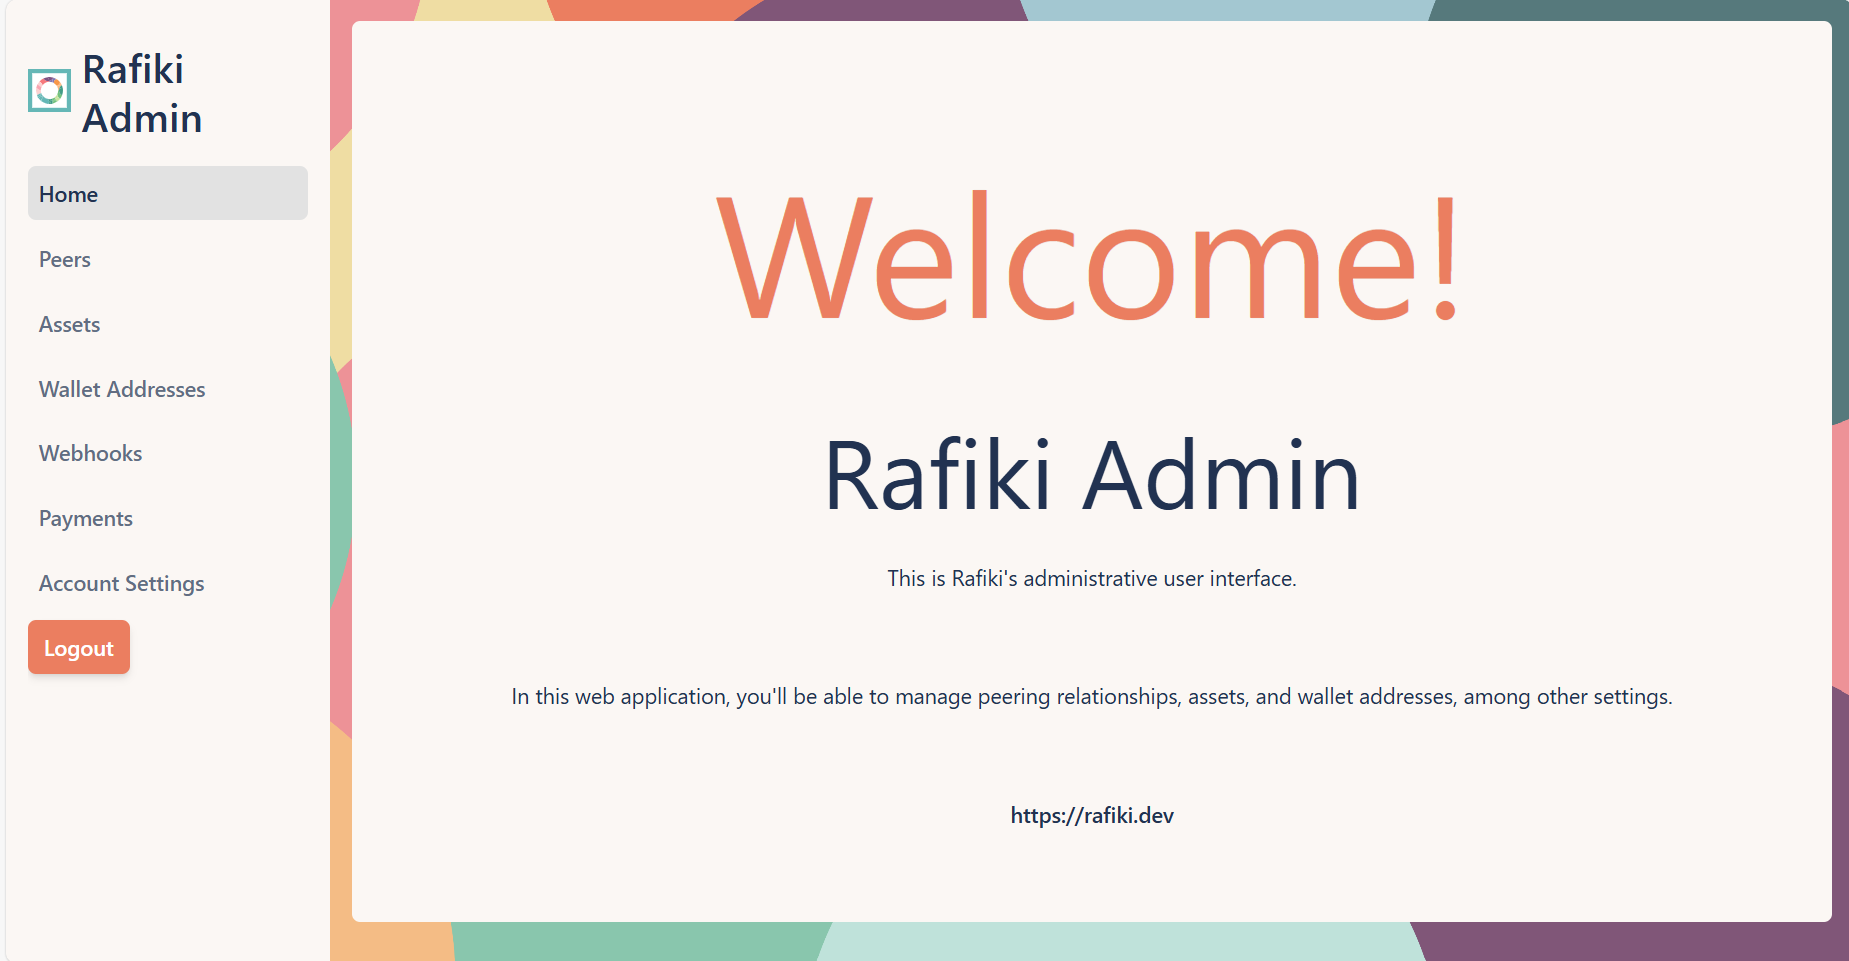
Each of the following menu items leads to a different page of the Rafiki Admin application:
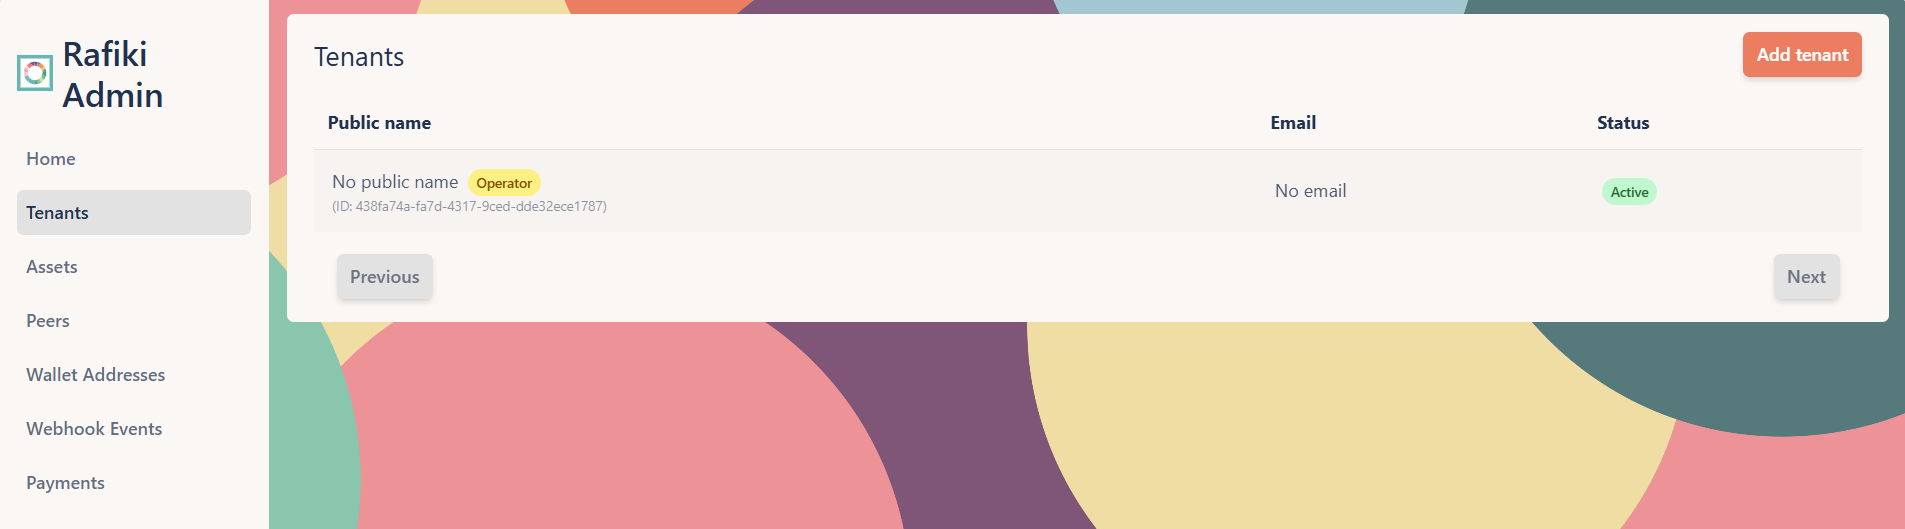
The Tenants page allows you to manage tenants in your Rafiki instance, including viewing, creating, editing, and deleting tenants.
On this page, all configured tenants appear in a table where you can view the tenant’s public name, email, and status. Operators are designated by a yellow “Operator” tag.
To create a new tenant, select Add tenant from the main Tenants page.
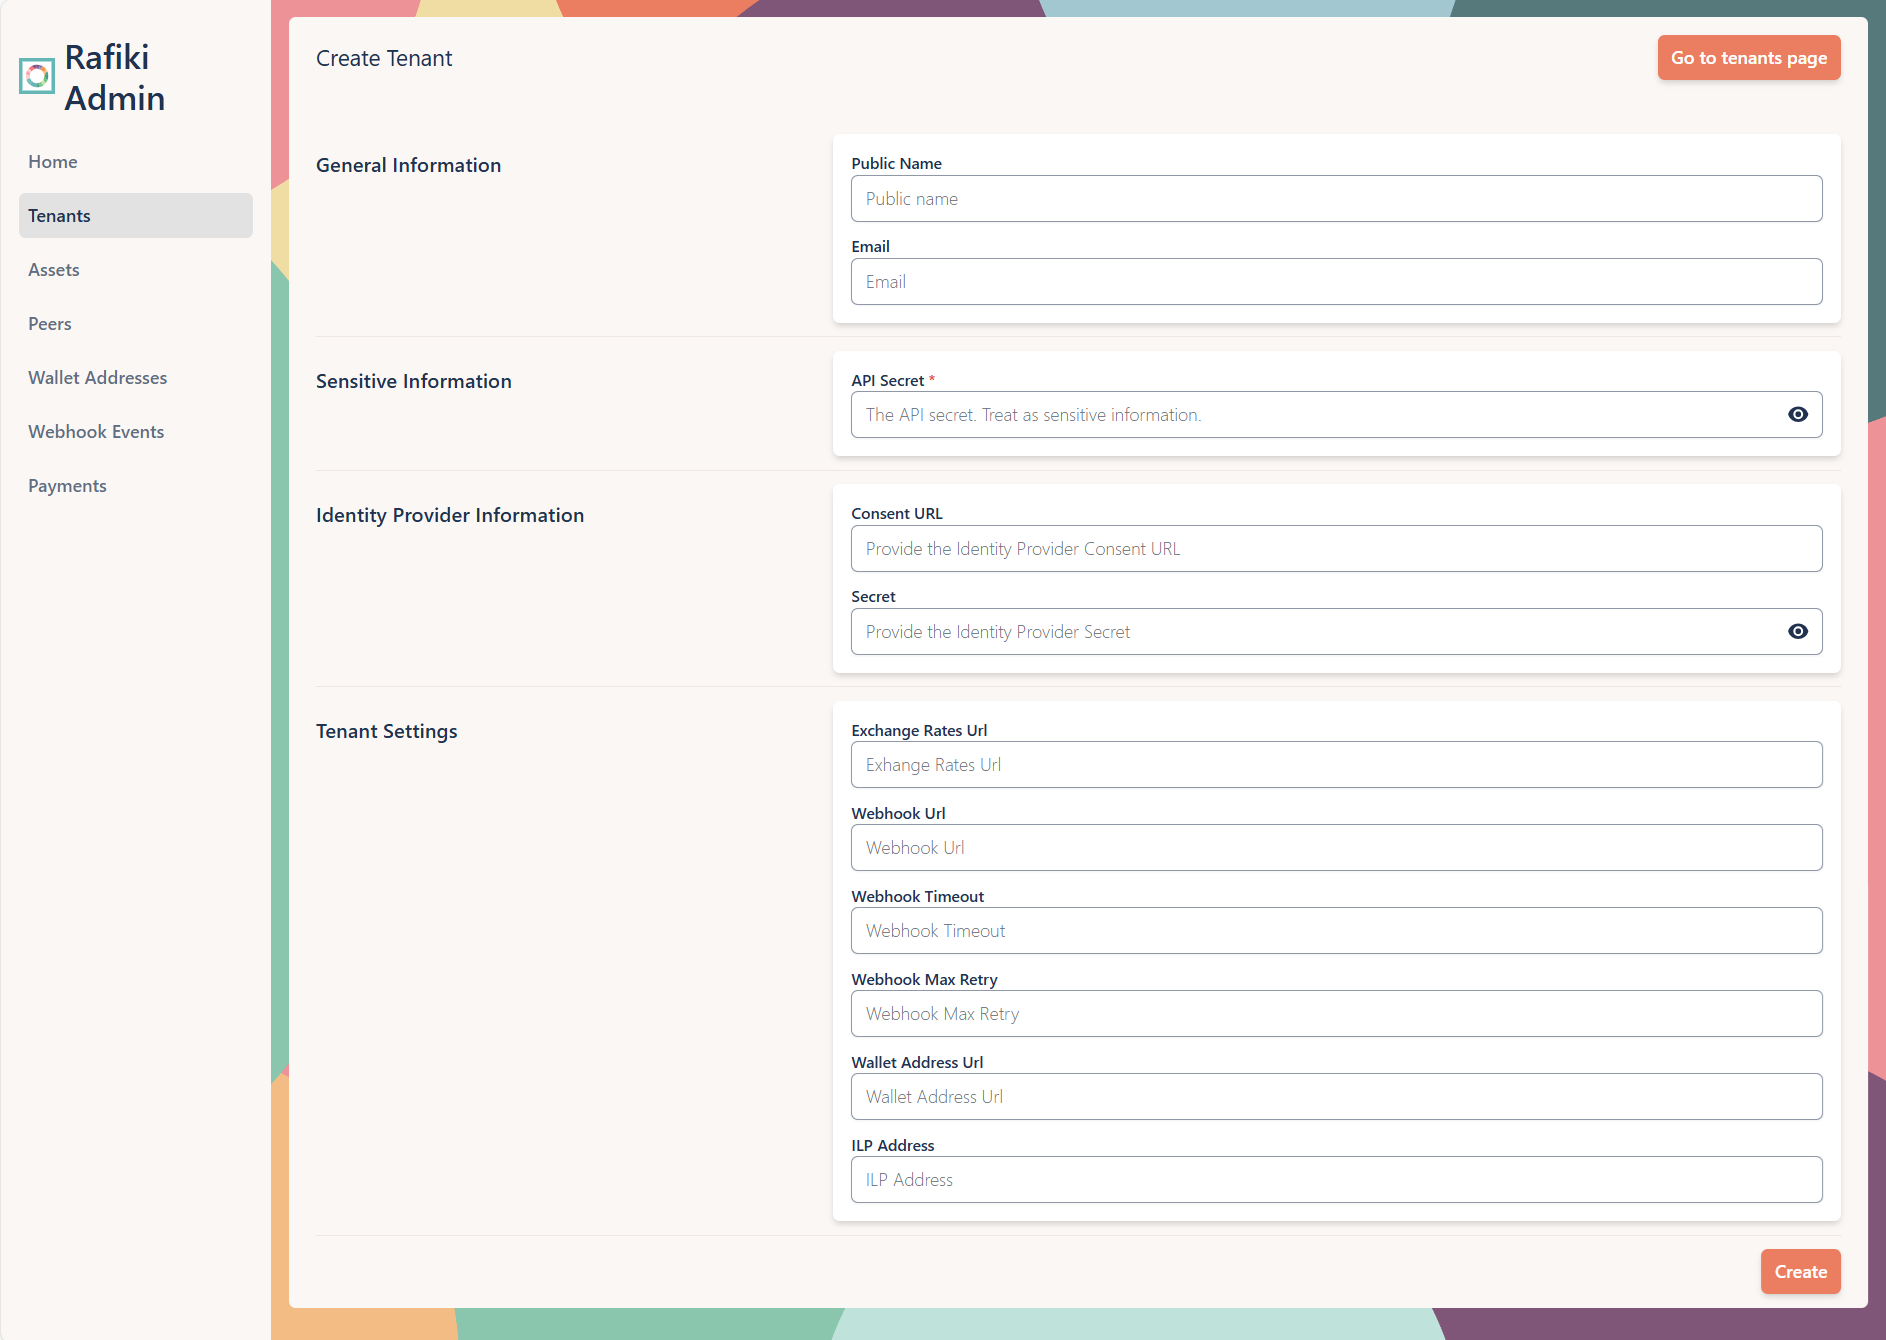
Fill out the following fields to configure and create your new tenant:
| Section | Field | Description |
|---|---|---|
| General Information | Public Name | A public name for the tenant. |
| The tenant’s email address. | ||
| Sensitive Information | API Secret | The API secret for the tenant. Treat as sensitive information. |
| Identity Provider Information | Consent URL | The URL for the tenant’s identity provider consent endpoint. |
| Secret | The secret for the tenant’s identity provider. | |
| Tenant Settings | Exchange Rates Url | The URL for the tenant’s exchange rates service. |
| Webhook Url | The URL for the tenant’s webhook endpoint. | |
| Webhook Timeout | The timeout for the tenant’s webhook requests. | |
| Webhook Max Retry | The maximum number of retries for the tenant’s webhook requests. | |
| Wallet Address Url | The URL for the tenant’s wallet address service. | |
| ILP Address | The tenant’s Interledger Protocol (ILP) address. |
After completing these fields, select Create to add the new tenant.
To edit an existing tenant, select any tenant entry from the table on the main Tenants page. This opens the Edit Tenant page where you can view and change tenant settings.
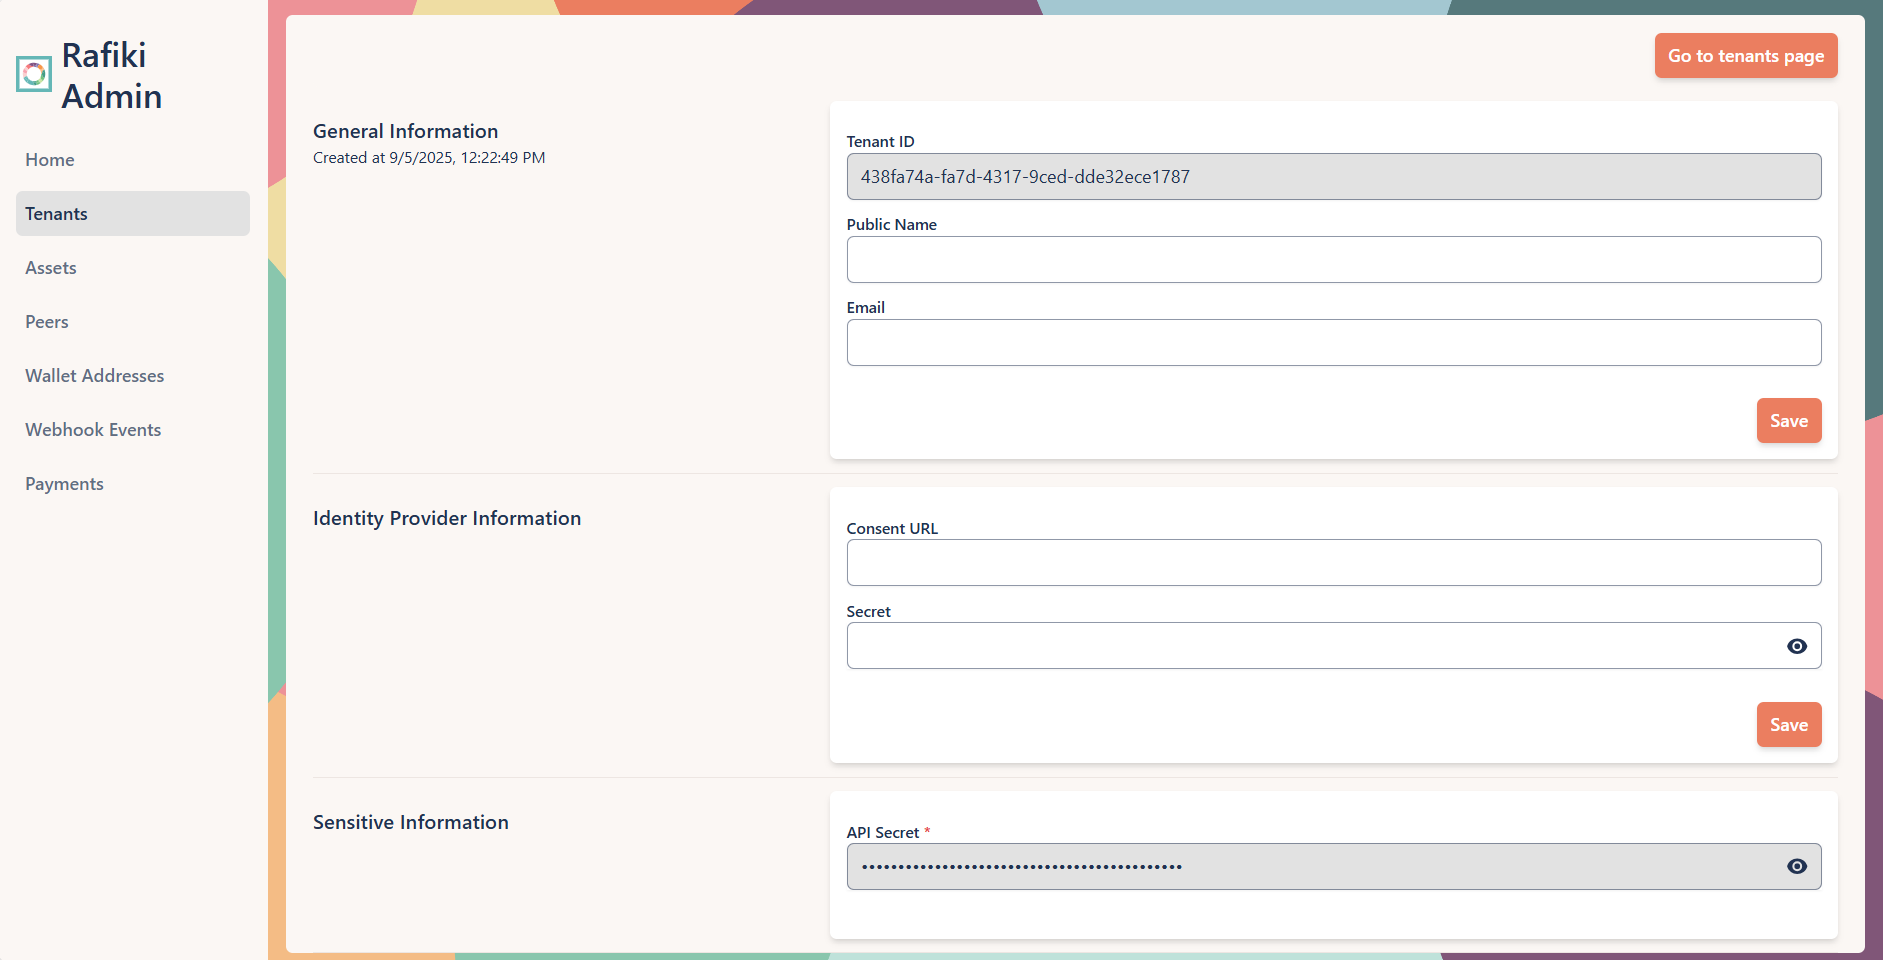
The Edit Tenant page includes the following sections:
| Section | Field | Description |
|---|---|---|
| General Information | Tenant ID | A unique identifier assigned by Rafiki when the tenant was created. This cannot be changed. |
| Public Name | A public name for the tenant. | |
| The tenant’s email address. | ||
| Identity Provider Information | Consent URL | The URL for the tenant’s identity provider consent endpoint. |
| Secret | The secret for the tenant’s identity provider. | |
| Sensitive Information | API Secret | A unique identifier assigned by Rafiki when the tenant was created. This cannot be changed. |
You can modify the public name, email, consent URL, and secret for a tenant. The tenant ID and API secret are read-only.
After editing any of the preceding fields, select Save to commit those changes.
As an operator, you may need to delete tenants from your Rafiki instance. The option to delete a tenant is only visible when viewing a non-operator tenant. An operator cannot delete themselves.
To perform this irreversible action, select Delete tenant. Confirm the deletion by typing “delete tenant” into the text field and selecting Delete this tenant.
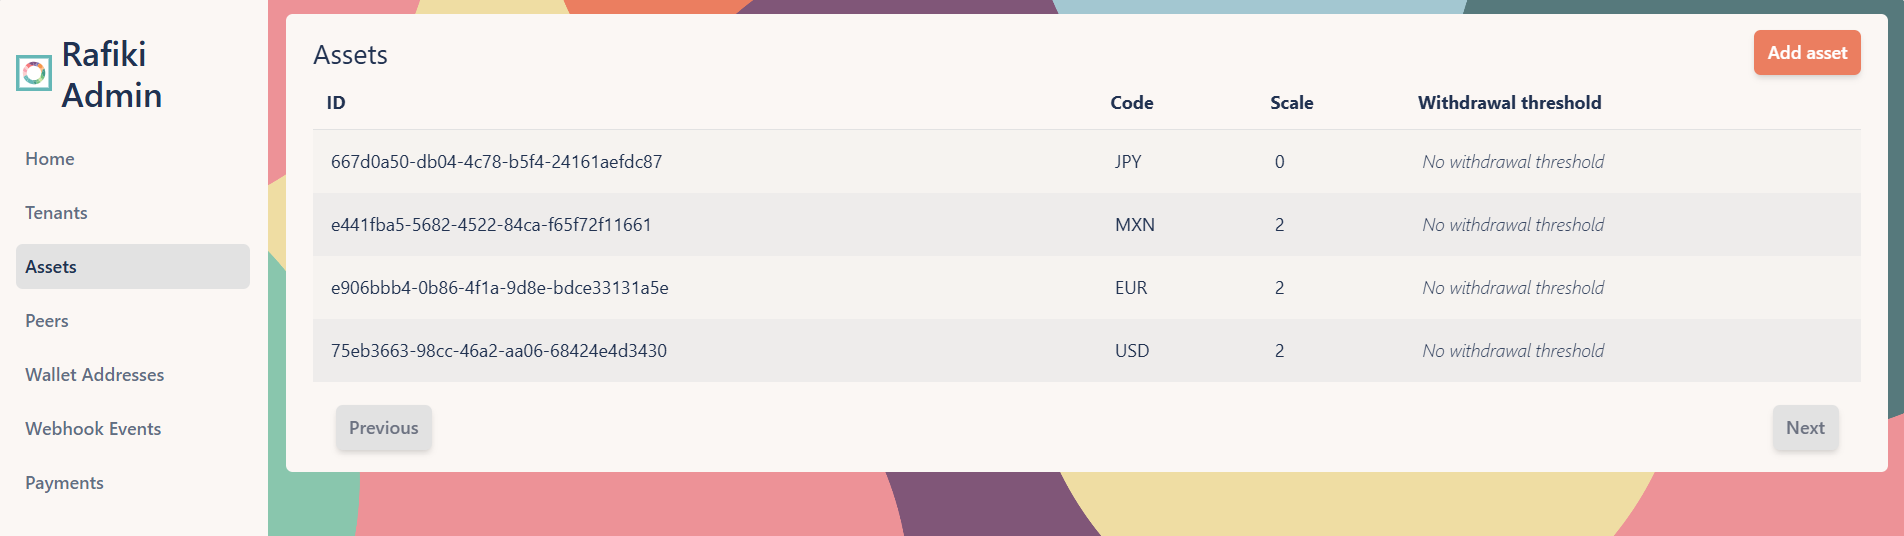
The Assets page allows you to manage assets in your Rafiki instance, including viewing, editing, and creating assets.
On this page, all configured assets appear in a table where you can view the asset ID, the asset code, the scale, and the withdrawal threshold. The list of assets shows only those for the current tenant, as determined by your API credentials.
To create a new asset, select Add Asset from the main Assets page.
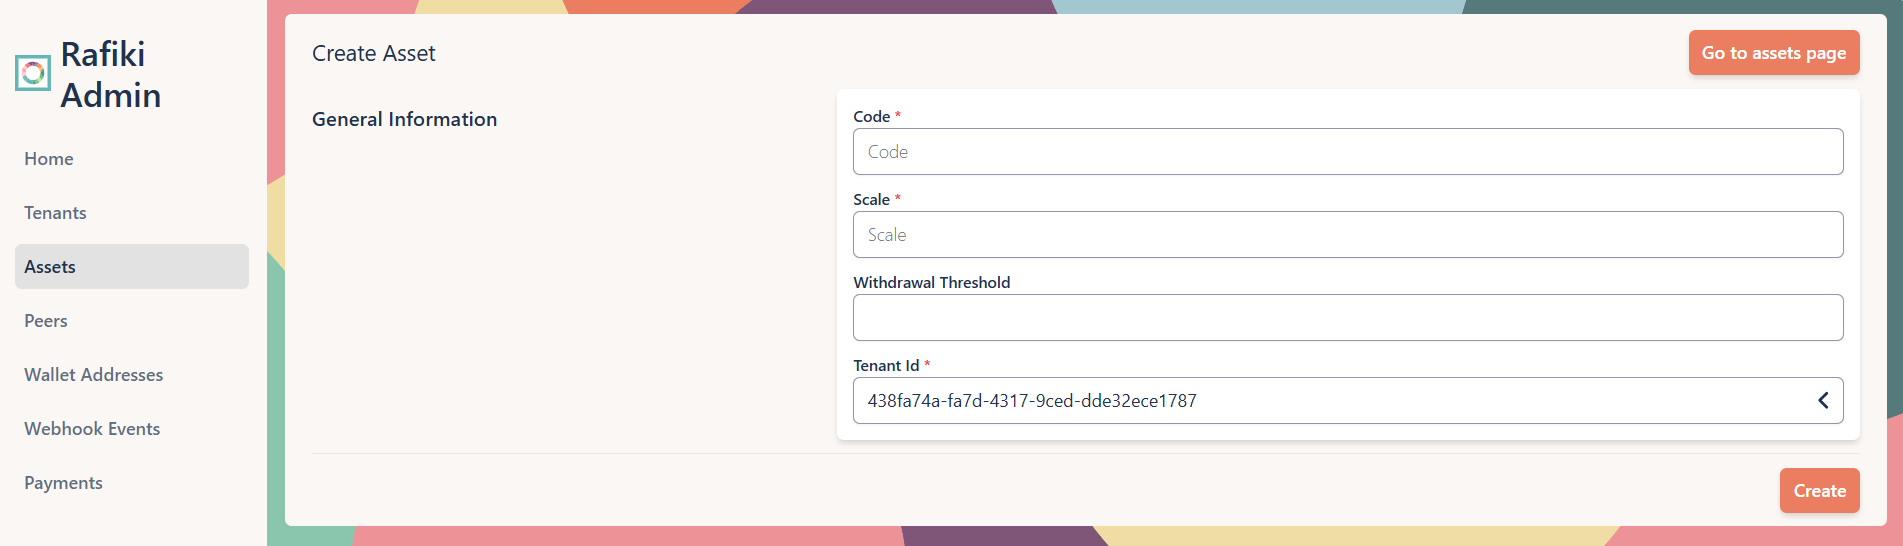
Fill out the following fields to create your new asset:
| Section | Field | Description |
|---|---|---|
| General Information | Code | The asset code, generally an ISO 4217 currency code where available. |
| Scale | Difference in order of magnitude between the standard unit and a fractional unit. | |
| Withdrawal Threshold | The minimum amount of liquidity that can be withdrawn from the asset. | |
| Tenant Id | Select a tenant to associate with this asset. |
After completing these fields, select Create to add the new asset.
To edit an existing asset, select any asset entry from the table on the main Assets page. This opens the Edit Asset page where you can view and change asset settings.
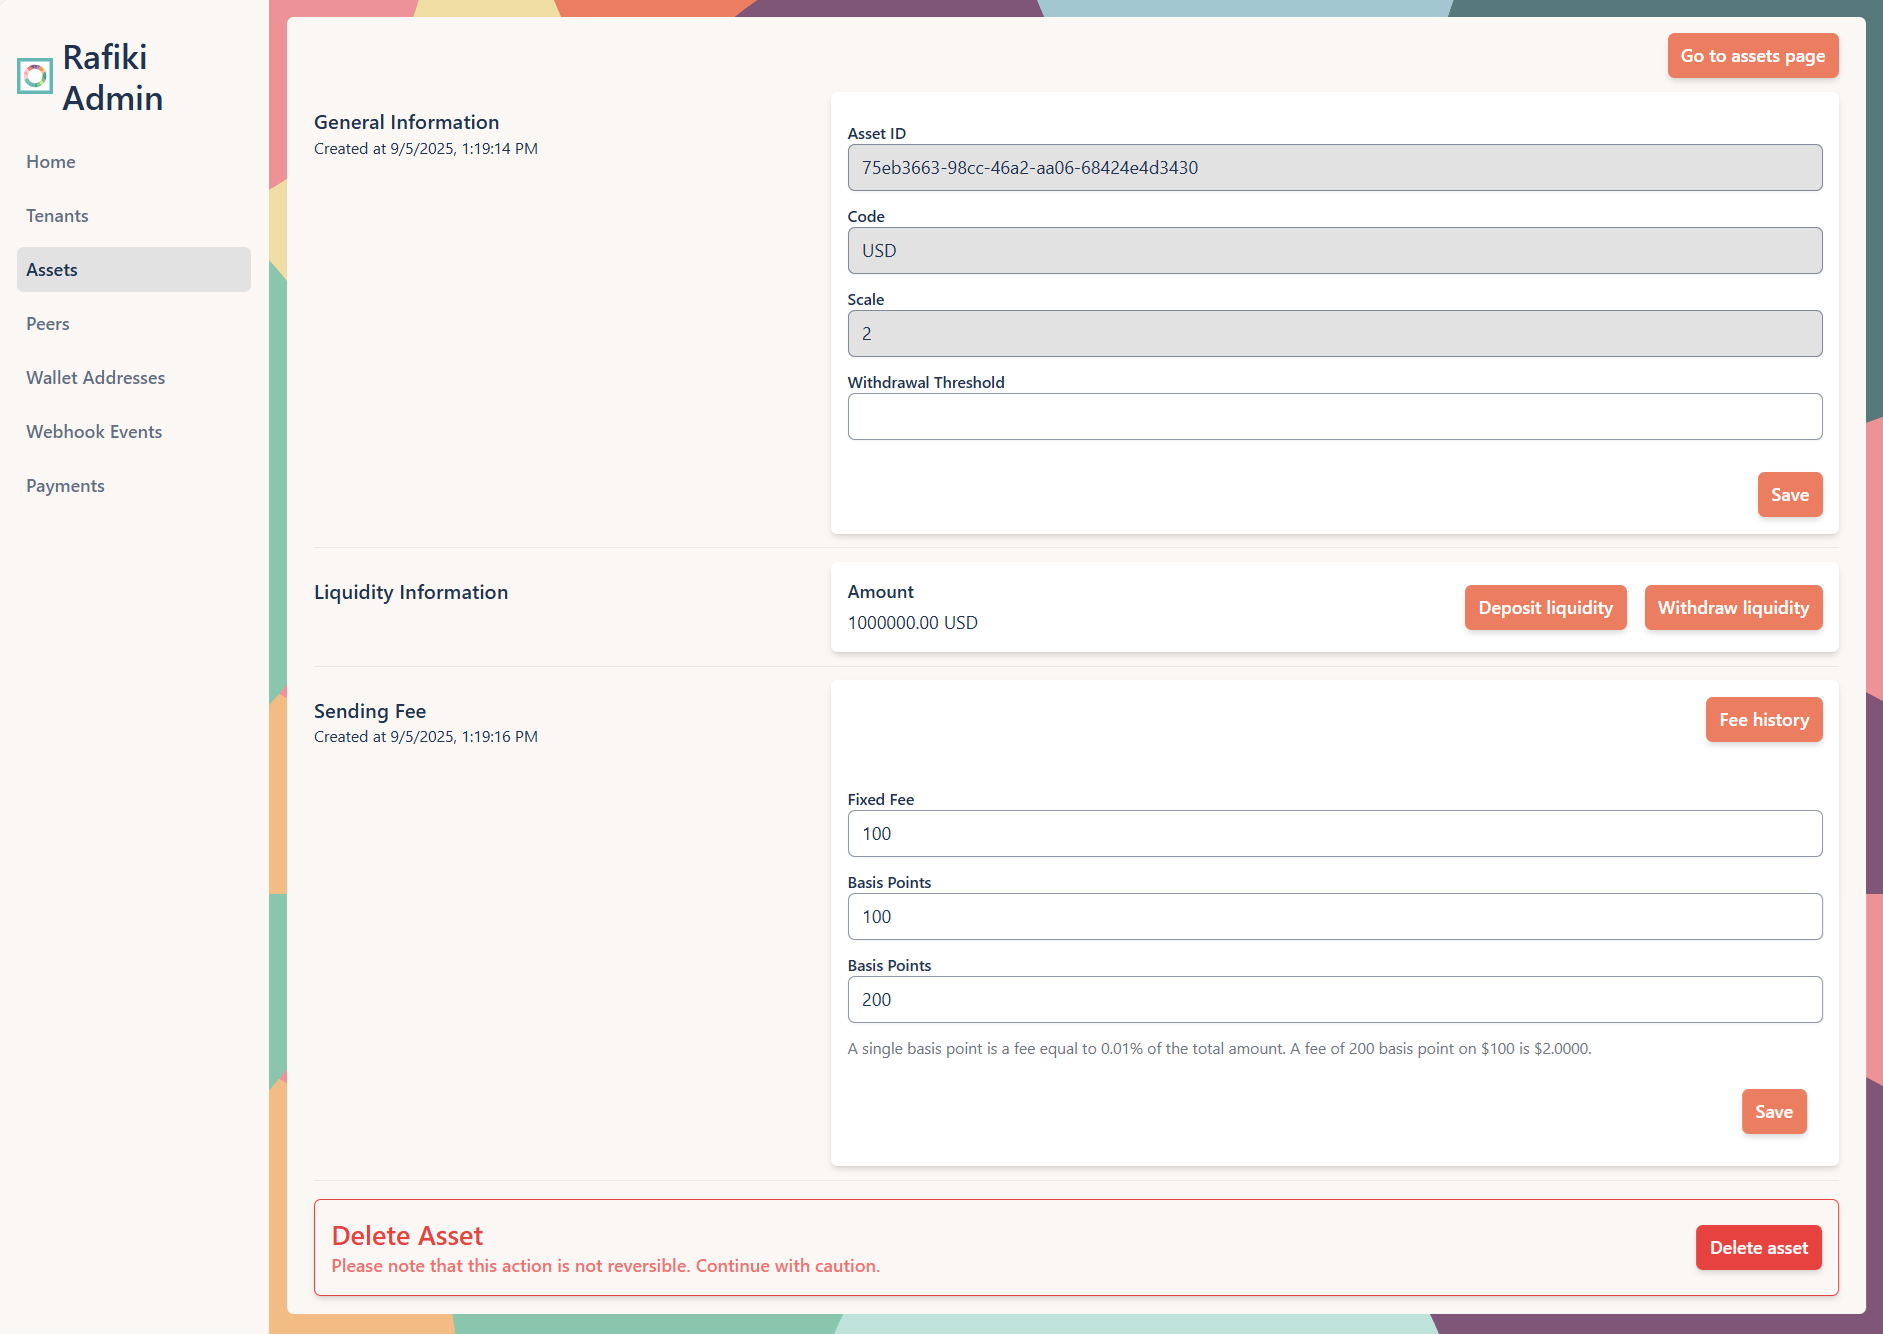
While the Edit Asset page shares fields with the Create Asset page, it also includes fields and actions specific to managing an existing asset:
| Section | Field/Action | Description |
|---|---|---|
| General Information | Asset ID | A unique identifier assigned by Rafiki when the asset was created. This cannot be changed. |
| Liquidity Information | Amount | Current amount of asset liquidity available. |
| Deposit Liquidity | To increase the amount of liquidity available, select Deposit liquidity. | |
| Withdraw Liquidity | To reduce the amount of liquidity available, select Withdraw liquidity. | |
| Sending Fee | Fixed Fee | Flat fee per asset, specified in the smallest unit as defined by the asset scale. In our screenshot above, a fixed fee value of 100 with a scale of 2 represents 1 USD. |
| Basis Points | A variable fee per asset. One basis point fee is equal to 0.01% of the total amount, 100 basis points = 1%, 10000 basis points = 100% | |
| Fee history | To view a list of asset fees over time, select Fee history. |
After editing any of the preceding fields in the General Information or Sending Fee sections, select Save to commit those changes.
The final section of the Edit Asset page is the irreversible action of deleting an asset. Select Delete asset to make this change.
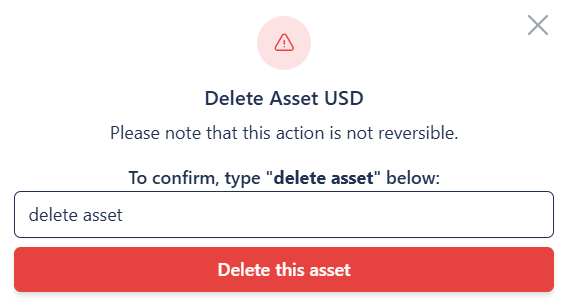
Confirm the deletion by typing “delete asset” into the text field and selecting Delete this asset.
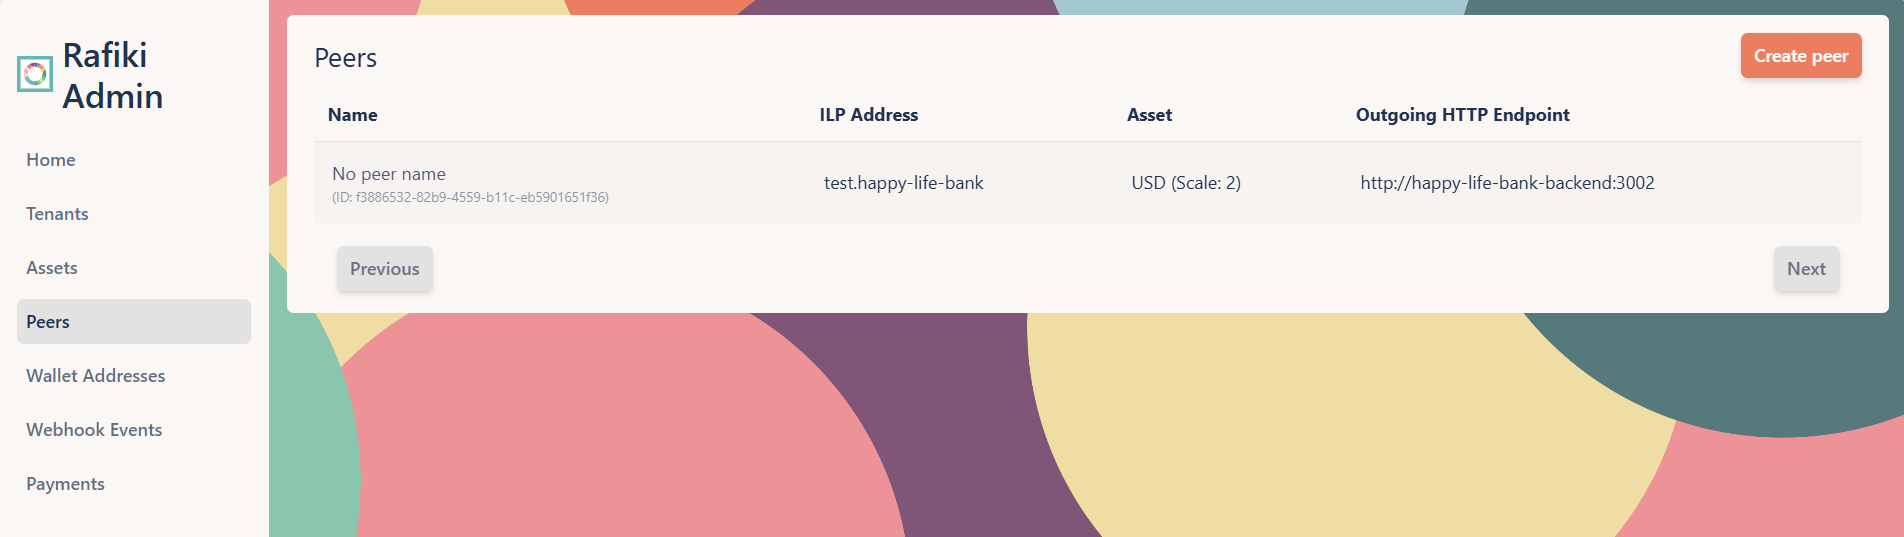
The Peers page allows you to manage peering relationships in your Rafiki instance, including viewing, creating, editing, and deleting peers.
On this page, all configured peers appear in a table where you can view the peer name, its ILP address, asset details including the asset type and scale, and the outgoing HTTP endpoint. The list of peers shows only those for the current tenant, as determined by your API credentials.
To create a new peer, select Create Peer from the main Peers page.
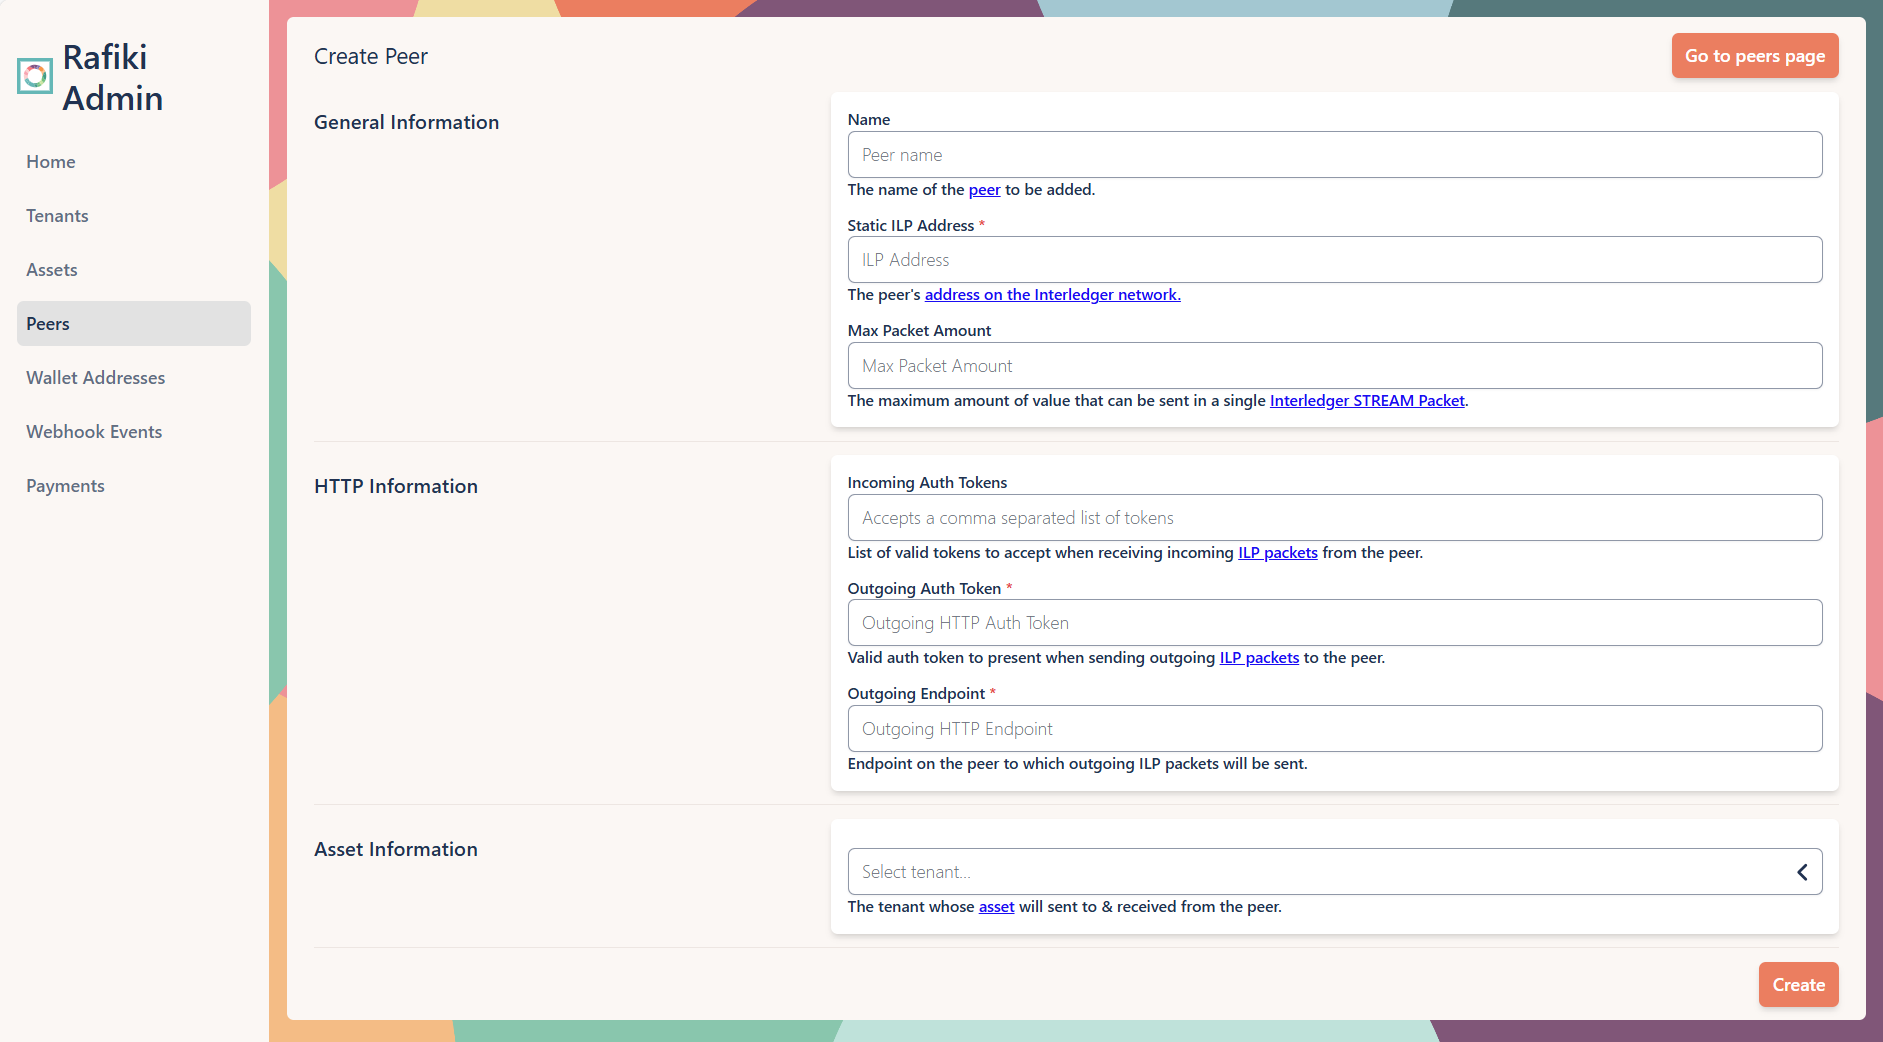
Fill out the following fields to configure and create your peer:
| Section | Field | Description |
|---|---|---|
| General Information | Name | A public name for the peer to identify it on your system. |
| Static ILP Address | The peer’s ILP address, obtained from the peer. | |
| Max Packet Amount | The agreed-upon maximum number of packets a payment is split into. | |
| HTTP Information | Incoming Auth Tokens | A comma-separated list of tokens accepted by your Rafiki instance from a peer for incoming requests. |
| Outgoing Auth Token | A single token used by your Rafiki instance for all outgoing requests to authenticate itself with the peer. | |
| Outgoing Endpoint | The URL of the peer’s server where your Rafiki instance sends outgoing requests. | |
| Asset Information | Tenant | The tenant whose asset will be used for transactions with this peer. |
If you are an operator, you must select a tenant when creating a new peer. The asset selection dropdown is dynamically populated based on the selected tenant. If you don’t have any tenants, the tenant ID will default to your own.
After completing these fields, select Create to add the new peer.
To edit an existing peer, select any peer entry from the table on the main Peers page. This opens the Edit Peer page where you can view and change peer settings.
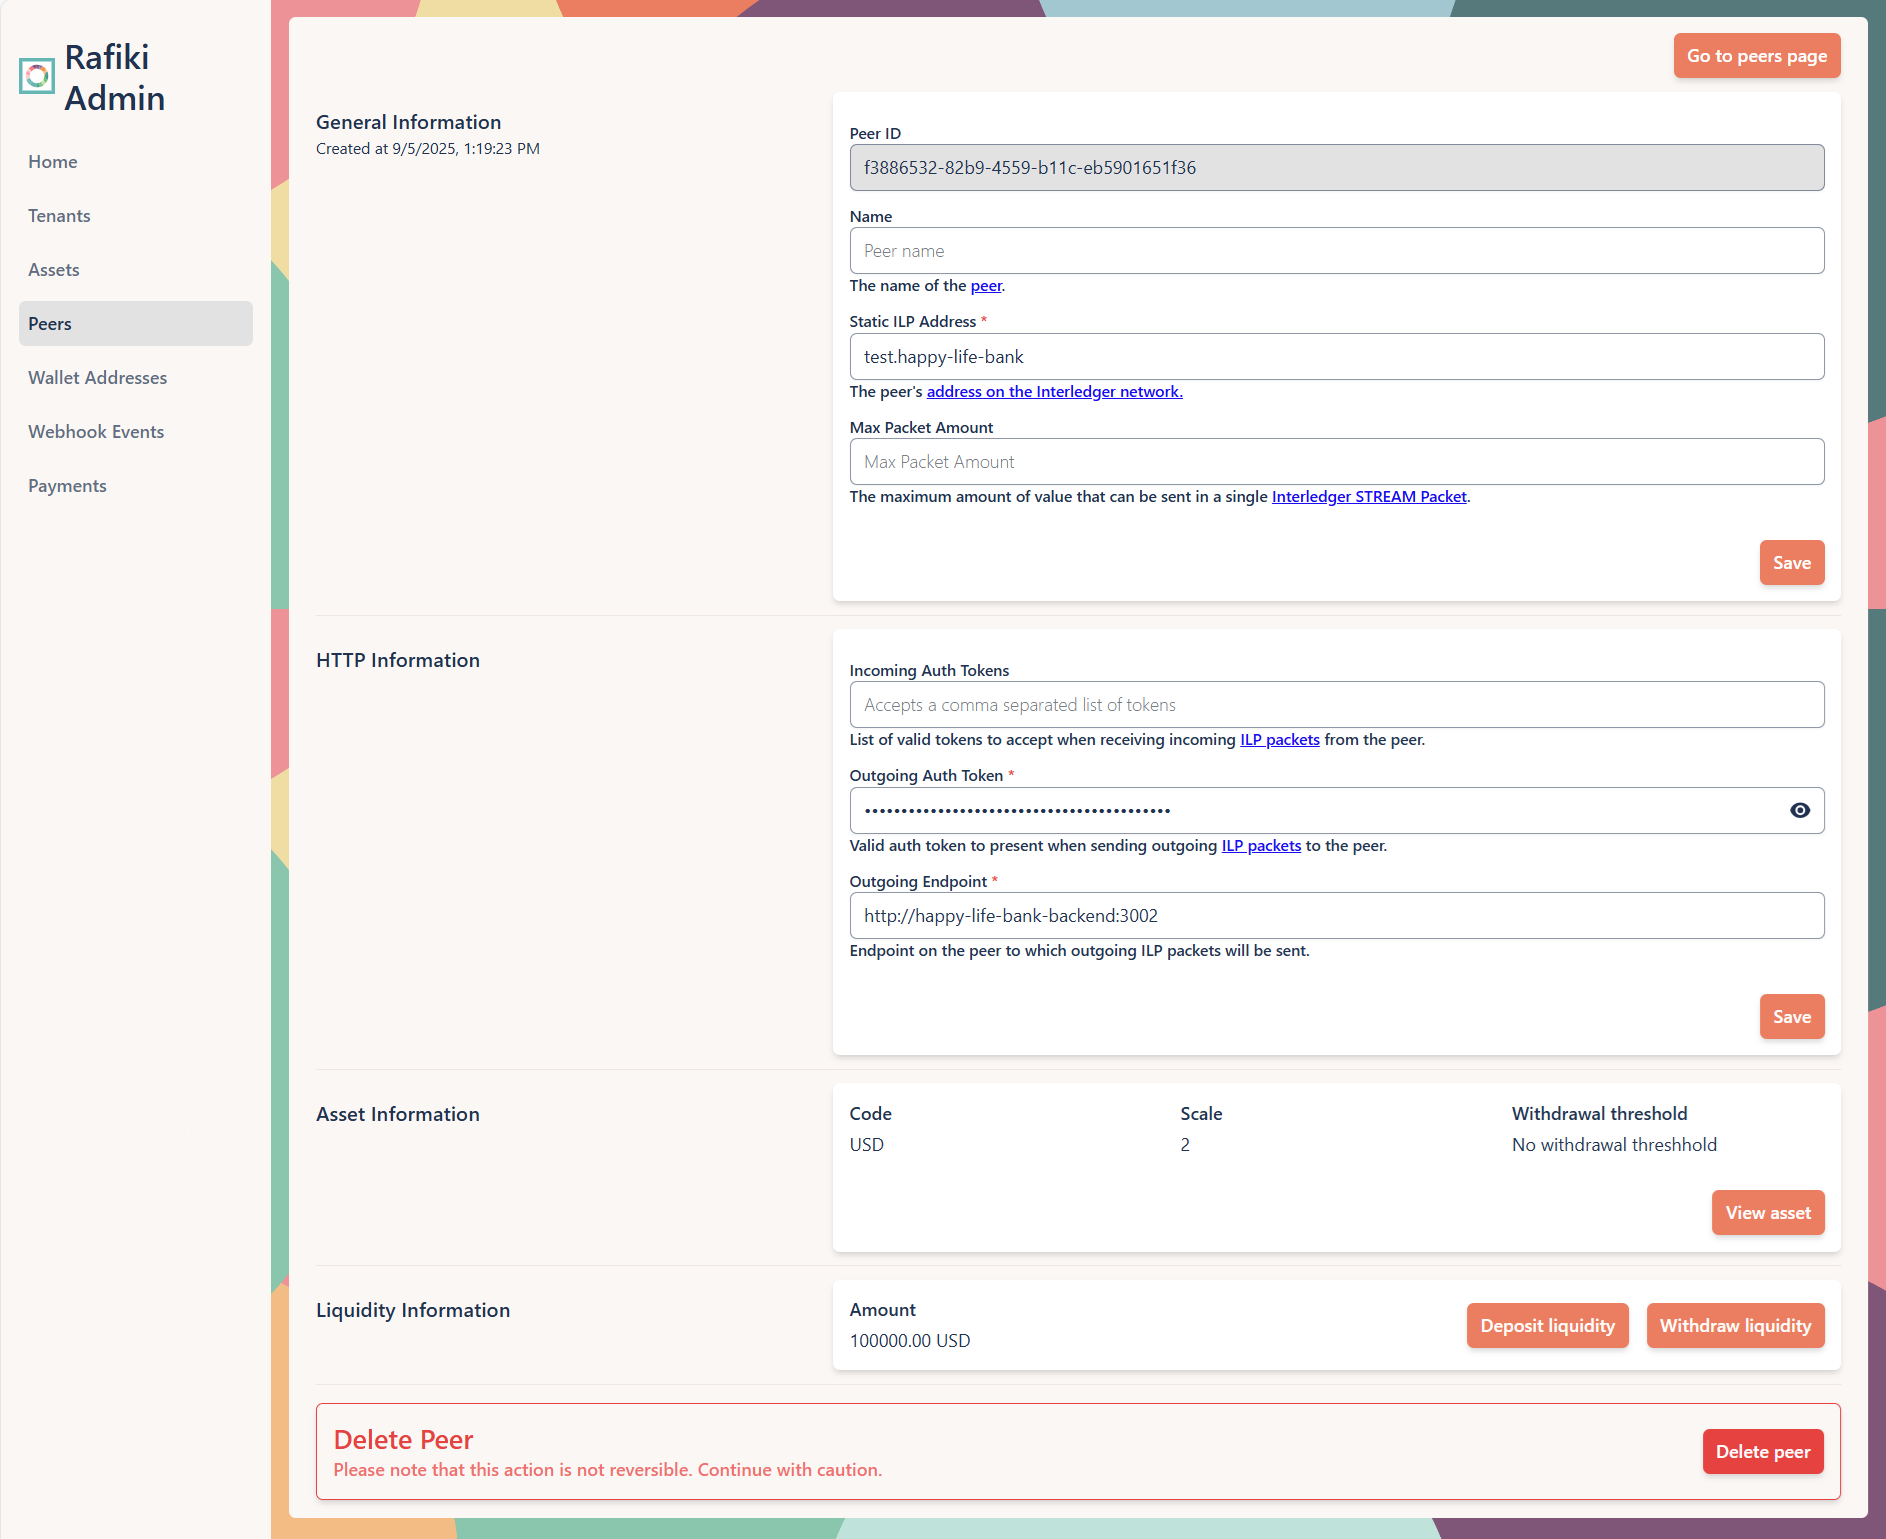
While the Edit Peer page shares fields with the Create Peer page, it also includes fields and actions specific to managing an existing peer:
| Section | Field/Action | Description |
|---|---|---|
| General Information | Peer ID | A unique identifier assigned by Rafiki when the peer was created. This cannot be changed. |
| Asset Information | View Asset | For more information about an asset, select View asset. |
| Liquidity Information | Amount | Current amount of peer liquidity available. |
| Deposit Liquidity | To increase the amount of liquidity available, select Deposit liquidity. | |
| Withdraw Liquidity | To reduce the amount of liquidity available, select Withdraw liquidity. |
After editing any of the preceding fields in the General Information or HTTP Information sections, select Save to commit those changes.
The final section of the Edit Peer page is the irreversible action of deleting a peer. Select Delete peer to make this change.
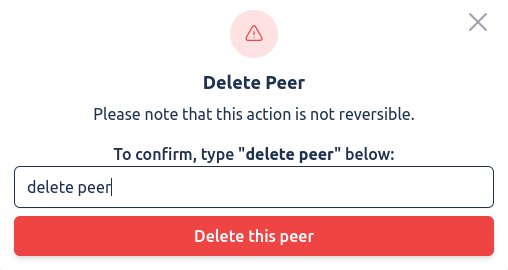
Confirm the deletion by typing “delete peer” into the text field and selecting Delete this peer.
The Wallet Addresses page allows you to manage the wallet addresses associated with your Rafiki instance, including viewing, editing, and creating wallet addresses.
On this page, all configured wallet addresses appear in the table where you can view the address URL, the public name, and the wallet status. The list of wallet addresses shows only those for the current tenant, as determined by your API credentials.
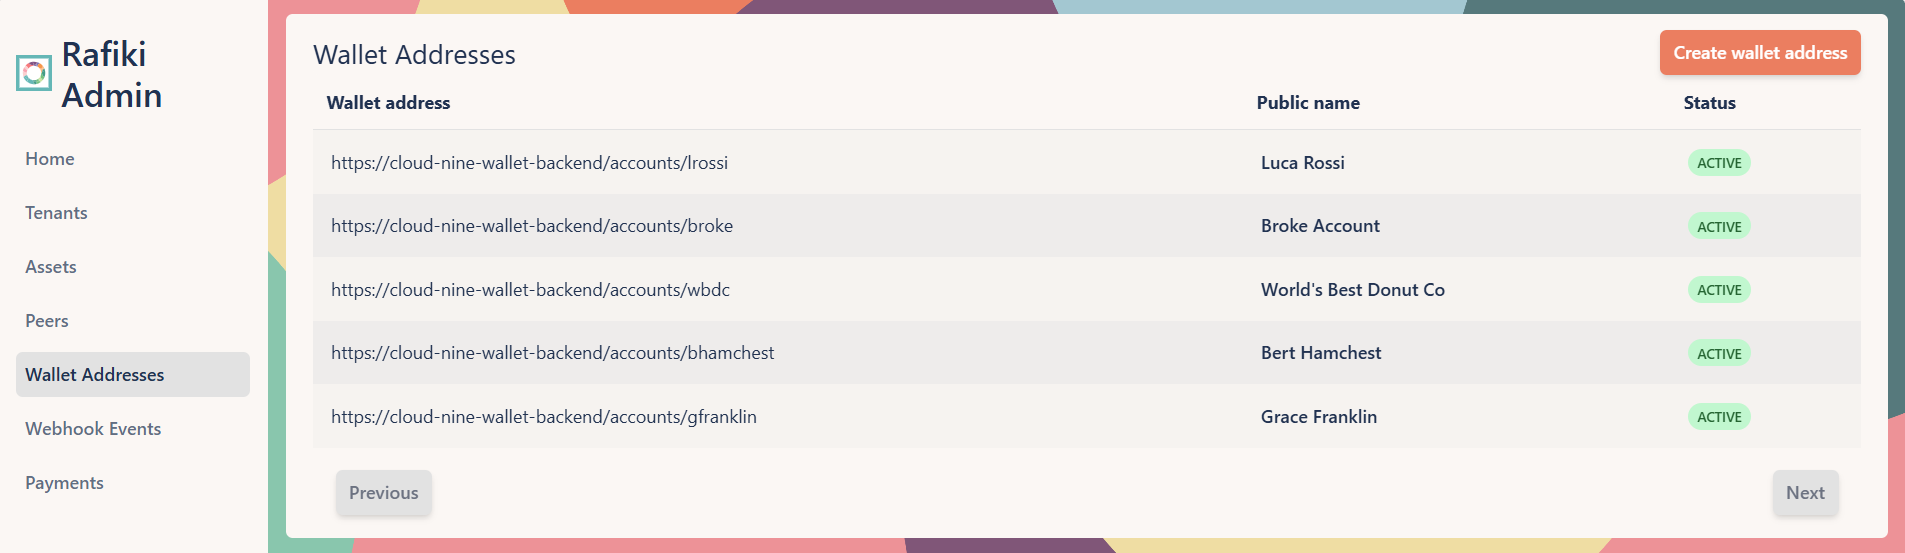
To create a new wallet address, select Create wallet address from the main Wallet Address page.
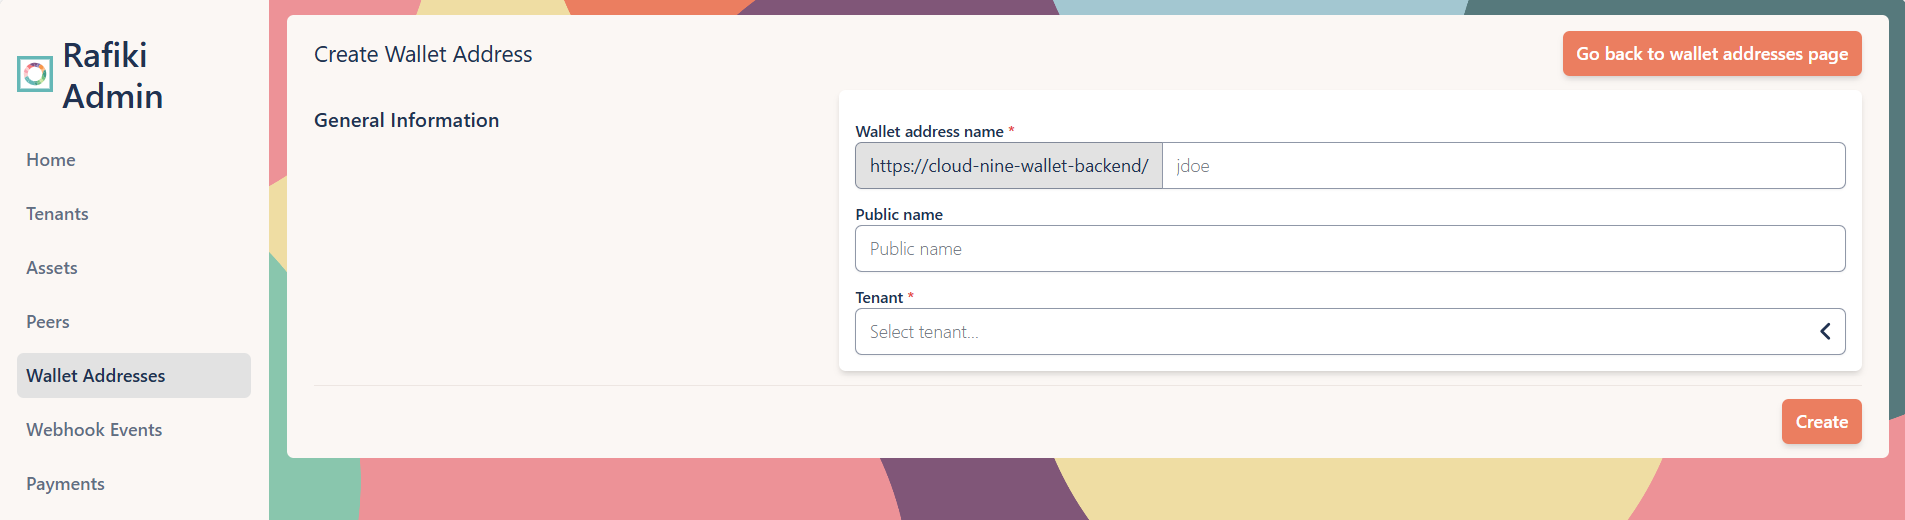
Fill out the following fields to create a new wallet address:
| Section | Field | Description |
|---|---|---|
| General Information | Wallet address name | The case-insensitive URL of the wallet. Once set, it cannot be changed. |
| Public name | The name associated with the wallet that is visible to anyone with the URL. | |
| Tenant | Select a tenant to associate with this wallet. |
After completing this section, select Create to add the new wallet address.
To edit an existing wallet address, select any wallet address entry from the table on the main Wallet Addresses page. This opens the Edit Wallet Address page where you can view and change wallet address details.
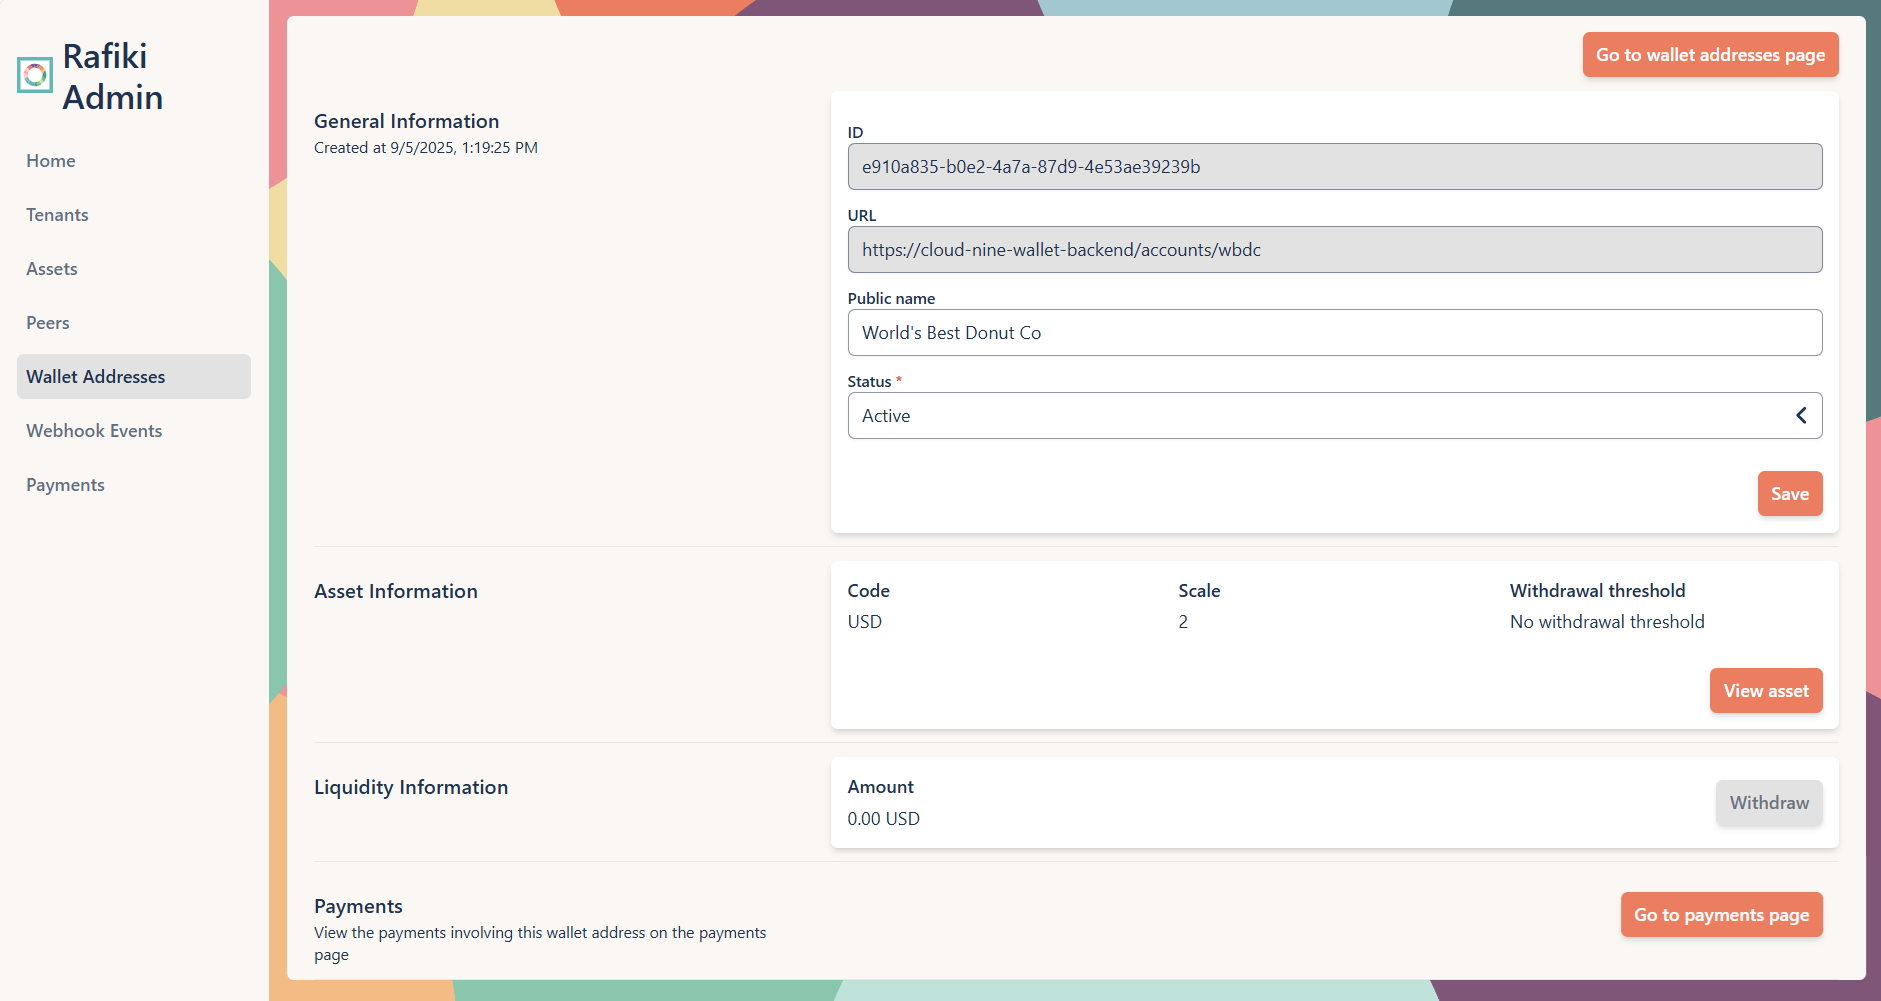
While the Edit Wallet Address page shares fields with the Create Wallet Address page, it also includes fields and actions specific to managing an existing wallet address.
| Section | Field/Action | Description |
|---|---|---|
| General Information | ID | A unique identifier assigned by Rafiki when the wallet was created. This cannot be changed. |
| URL | The wallet address. This cannot be changed. | |
| Status | The current status of the wallet, either active or inactive. | |
| Asset Information | Code | The asset code, generally an ISO 4217 currency code where available. |
| Scale | Difference in order of magnitude between the standard unit and a fractional unit. | |
| Withdrawal threshold | The minimum amount of liquidity that can be withdrawn from the asset. | |
| View asset | For more information about an asset, select View asset. | |
| Liquidity Information | Amount | Current amount of liquidity available for this wallet. |
| Withdraw | To withdraw funds from this wallet, select Withdraw. | |
| Payments | Go to payments page | Navigates to the Payments page but with the wallet address ID filter auto-populated. |
After editing any of the preceding fields in the General Information section, select Save to commit those changes.
The Webhook Events page allows you to monitor and manage webhook events within your Rafiki instance. Webhook events in Rafiki are the main communication channel between you and your Rafiki instance. See Webhook events for more information about webhook events.
All triggered webhook events appear in the table. For each webhook event, you can see the webhook ID, the event type, and the date and time of the event. A field at the top of the page allows you to filter the table by event type, making it easier to drill down into specific events.

To view the webhook event as a JSON representation, select View data.
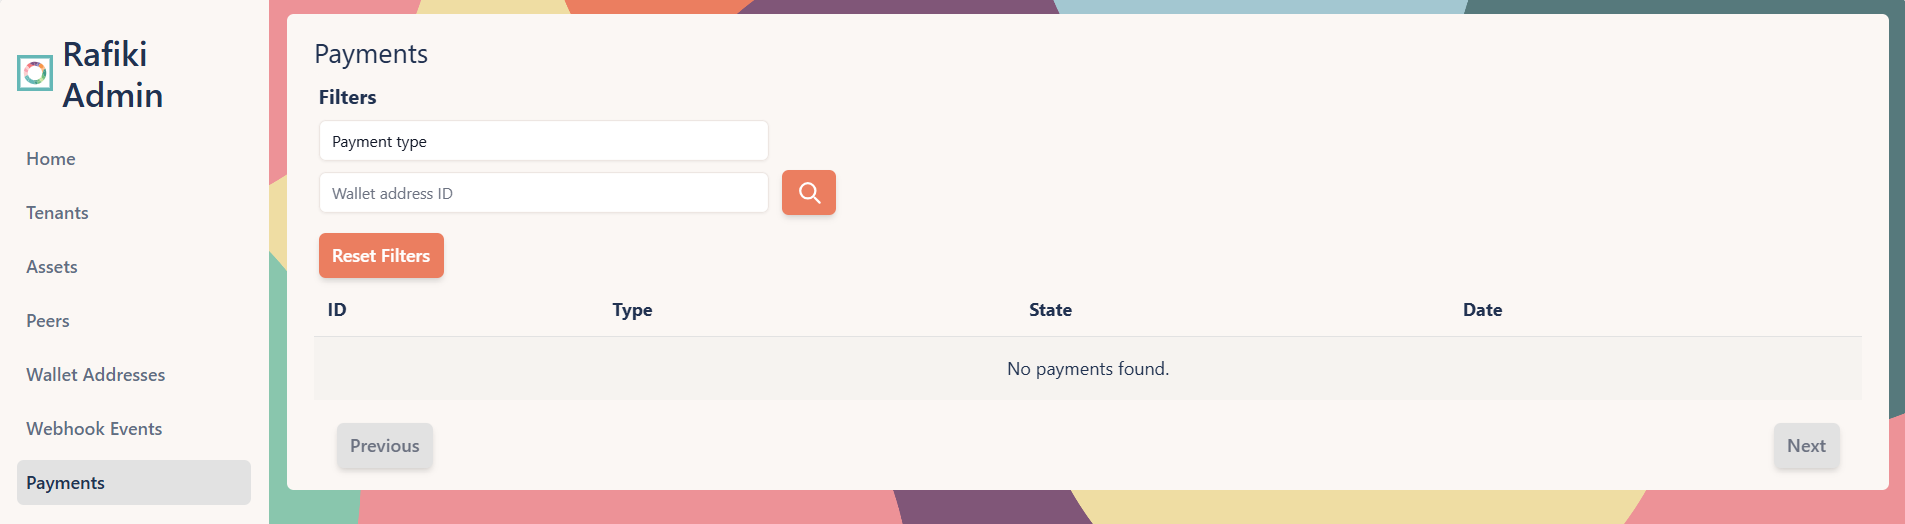
The Payments page allows you to view all incoming and outgoing payments in your Rafiki instance. This allows you to monitor payment activity as well as track the status of payments.
All payments appear in the table. For each payment, you can view the unique payment ID, type of payment, state of the payment, and the date and time the payment was created. Fields at the top of the page allow you to filter the table by payment type and wallet address ID, making it easier to drill down into specific transactions.
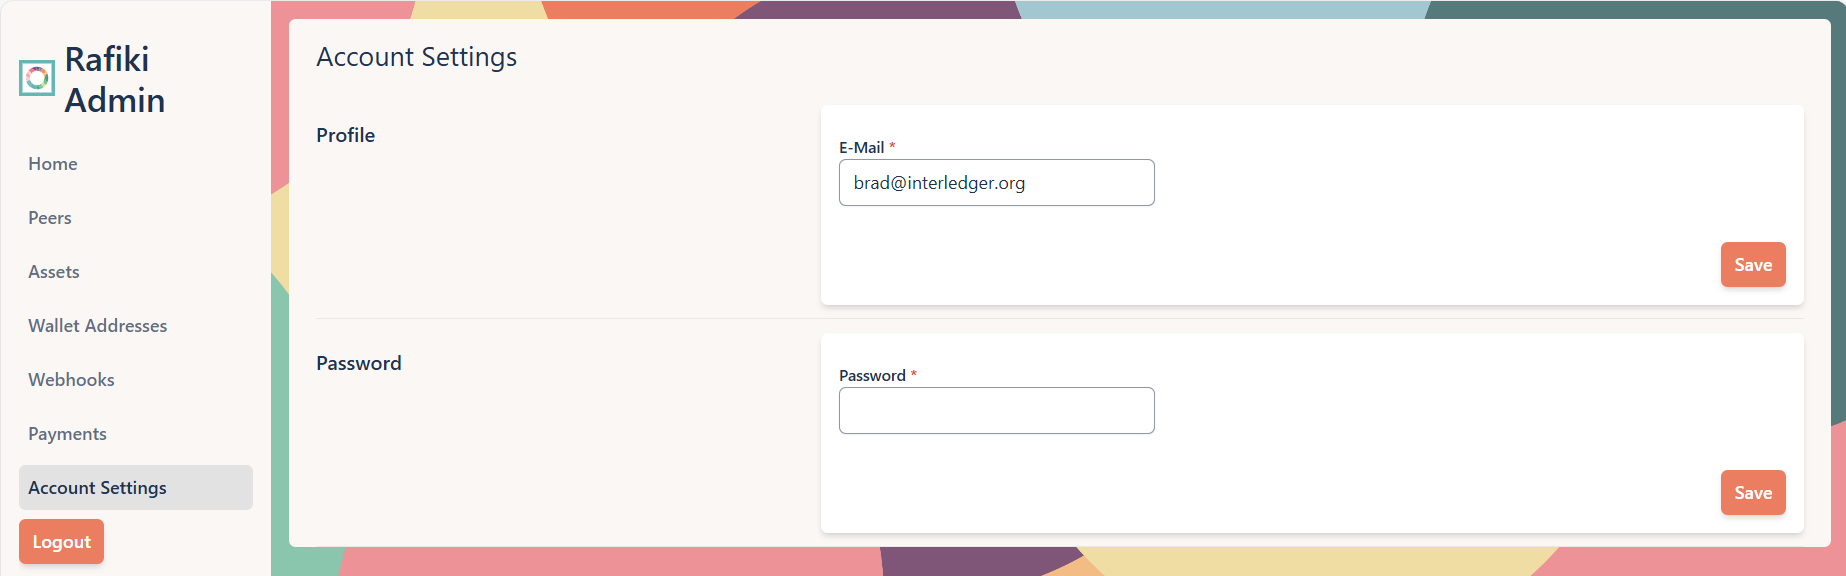
The Account Settings page allows you to manage your personal account information, including updating your email address and password.
To change your email address, enter the new email address and select Save.
To change your password, enter your new password and select Save.